In this project, it will go through the pipeline for training object detector using YOLO v3 and v4.
Training Pipeline
1. Change Runtime Type
Runtime -> Change runtime type -> Select hardware Accelerator as GPU.
2. Link Google Drive
1
2
from google.colab import drive
drive.mount('/content/drive')
Enter into the folder:
%cd /content/drive/My\ Drive/Mask\ Detector
3. Clone DarkNet Repository
!git clone https://github.com/AlexeyAB/darknet.git
4. Compile DarkNet
- Build darknet with OpenCV
- Build with CUDA enabled
- Build with cuDNN enabled.
Enter into darknet folder:
%cd darknet
!sed -i 's/OPENCV=0/OPENCV=1/' Makefile
!sed -i 's/GPU=0/GPU=1/' Makefile
!sed -i 's/CUDNN=0/CUDNN=1/' Makefile
print("Building. . . It might take 2-3 minutes")
!make &> build_log.txt
print("Build Done!")
5. Prepare Dataset Files
see data_prepare.py. (This file modifies the .txt file directing the images and labels).
6. Prepare Configuration File for YOLO Training
- train.cfg
- test.cfg
- setup.data
- class.names
Should modify each file accordingly. See more details in appendix.
7. Prepare weights for Convolutional backbone
Yolo v3 pre-trained weights:
https://pjreddie.com/media/files/darknet53.conv.74
Yolo v4 pre-trained weights:
https://github.com/AlexeyAB/darknet/releases/download/darknet_yolo_v3_optimal/yolov4.weights
8. Start Training
For starting training using darknet, we need to execute the following command. Here we are specifying the:
- path to the setup file,
- path to config file,
- path to convolutional weights file
!./darknet detector train ../configuration_v3/setup.data ../configuration_v3/train.cfg ./backup/darknet53.conv.74 -dont_show -map 2> train_log.txt
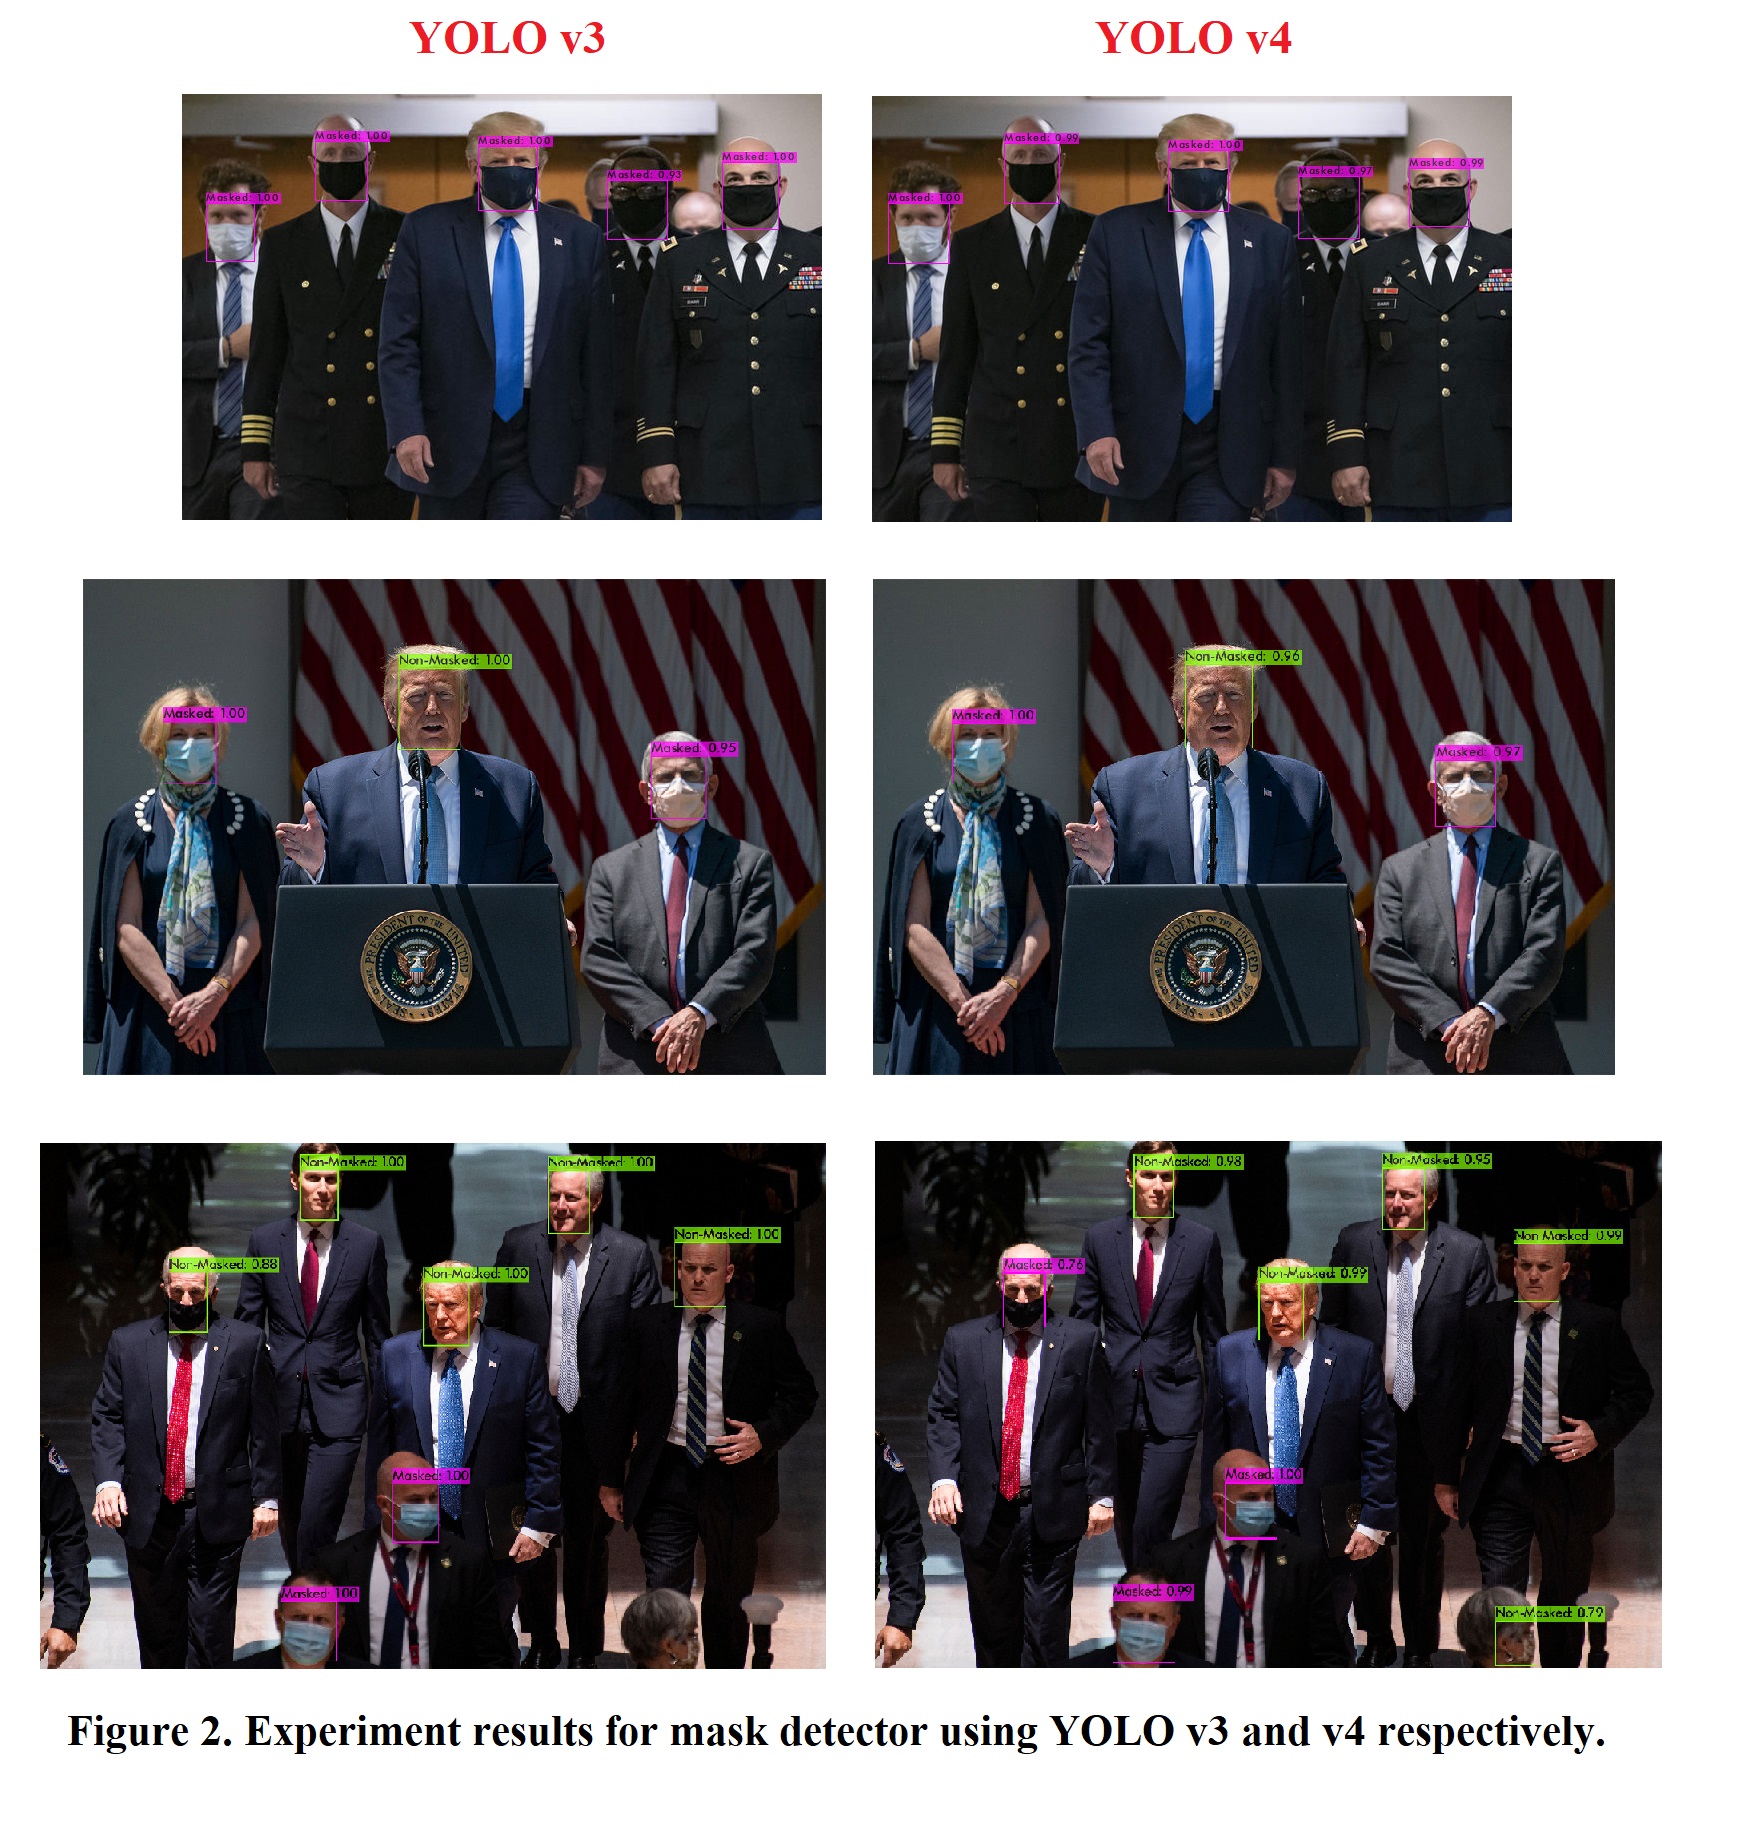
Experiments & Results
APPENDIX: Training Configuration**
As explained in the theory section, we will use the config file to specify the various training parameters. A gist of all the parameters is given below:
a. Data Setup
In the file setup.data(included in our code), we need to provide information about the specifications for our object detector and some relevant paths.
The contents of the file are as follows:
1
2
3
4
5
classes = 1
train  = data_train.txt
valid  = data_test.txt
names = class.names
backup = backup/
The classes parameter needs the number of classes. In our case, it is 1.
You need to provide the absolute paths of the files data_train.txt and data_test.txt generated earlier, which have the list of files to be used for training(train parameter) and validation(valid parameter) respectively.
The names field represents the path of a file which contains the names of all the classes. We have included the class.names file which contains the class name Masks. You will need to provide its absolute path in your machine here.
Lastly, for the backup parameter, we need to give the path to an existing directory where we can store the intermediate weights files as the training progresses.
b. Training Config File
Along with the setup.data and class.names files, YOLOv3 also needs a configuration file train.cfg. It is based on the demo configuration file, yolov3-voc.cfg (comes with darknet code), which was used to train on the VOC dataset. All the important training parameters are stored in this configuration file. Let us understand what they mean and what values to set them to.
c. Batch hyper-parameter in YOLOv3
Let’s learn more about batch and subdivision parameter.
1
2
3
4
5
6
7
[net]
# Testing
# batch=1
# subdivisions=1
# Training
batch=64
subdivisions=16
The batch parameter indicates the batch size used during training.
Our training set contains a few hundred images, but it is not uncommon to train on million of images. The training process involves iteratively updating the weights of the neural network based on how many mistakes it is making on the training dataset.
It is impractical (and unnecessary) to use all images in the training set at once to update the weights. So, a small subset of images is used in one iteration, and this subset is called the batch size.
When the batch size is set to 64, it means 64 images are used in one iteration to update the parameters of the neural network.
d. Subdivisions configuration parameter in YOLOv3
Even though you may want to use a batch size of 64 for training your neural network, you may not have a GPU with enough memory to use a batch size of 64. Fortunately, Darknet allows you to specify a variable called subdivisions that lets you process a fraction of the batch size at one time on your GPU.
You can start the training with subdivisions=1, and if you get an Out of memory error, increase the subdivisions parameter by multiples of 2(e.g. 2, 4, 8, 16) till the training proceeds successfully. The GPU will process batch/subdivision number of images at any time, but the full batch or iteration would be complete only after all the 64 (as set above) images are processed.
During testing, both batch and subdivision are set to 1.
e. Width, Height, Channels
These configuration parameters specify the input image size and the number of channels.
1
2
3
width=416
height=416
channels=3
The input training images are first resized to width x height before training. Here we use the default values of 416×416. The results might improve if we increase it to 608×608, but it would take longer to train too. channels=3 indicates that we would be processing 3-channel RGB input images.
f. Momentum and Decay
The configuration file contains a few parameters that control how the weight is updated.
1
2
momentum=0.9
decay=0.0005
In the previous section, we mentioned how the weights of a neural network are updated based on a small batch of images and not the entire dataset. Because of this reason, the weight updates fluctuate quite a bit. That is why a parameter momentum is used to penalize large weight changes between iterations.
A typical neural network has millions of weights and therefore they can easily overfit any training data. Overfitting simply means it will do very well on training data and poorly on test data. It is almost like the neural network has memorized the answer to all images in the training set, but really not learned the underlying concept. One of the ways to mitigate this problem is to penalize large value for weights. The parameter decay controls this penalty term. The default value works just fine, but you may want to tweak this if you notice overfitting.
g. Learning Rate, Steps, Scales, Burn In (warm-up)
1
2
3
4
5
learning_rate=0.001
policy=steps
steps=800
scales=.1
burn_in=100
The parameter learning rate controls how aggressively we should learn based on the current batch of data. Typically this is a number between 0.01 and 0.0001.
At the beginning of the training process, we are starting with zero information and so the learning rate needs to be high. But as the neural network sees a lot of data, the weights need to change less aggressively. In other words, the learning rate needs to be decreased over time. In the configuration file, this decrease in learning rate is accomplished by first specifying that our learning rate decreasing policy is steps. In the above example, the learning rate will start from 0.001 and remain constant for 800 iterations, and then it will multiply by scales to get the new learning rate. We could have also specified multiple steps and scales.
In the previous paragraph, we mentioned that the learning rate needs to be high in the beginning and low later on. While that statement is largely true, it has been empirically found that the training speed tends to increase if we have a lower learning rate for a short period of time at the very beginning. This is controlled by the burn_in parameter. Sometimes this burn-in period is also called warm-up period.
h. Data augmentation
We know data collection takes a long time and it is difficult to find high quality annotated data. We want to make maximum use of this data by cooking up new data. This process is called data augmentation. For example, an image of the ambulance rotated by 5 degrees is still an image of a ambulance. The angle parameter in the configuration file allows you to randomly rotate the given image by ± angle.
Similarly, if we transform the colors of the entire picture using saturation, exposure, and hue, it is still a picture of the ambulance.
1
2
3
4
angle=0
saturation = 1.5
exposure = 1.5
hue=.1
We used the default values for training.
i. Number of iterations
Finally, we need to specify how many iterations should the training process be run for.
1
max_batches=1000
For multi-class object detectors, the max_batches number is higher, i.e. we need to run for more number of batches(e.g. in yolov3-voc.cfg). For an n-classes object detector, it is advisable to run the training for at least 2000*n batches. In our case with only 1 class, 1000 seemed like a safe number for max_batches.
You should try to change the parameter and see how it performs.
j. Change filters parameter in conv layers [Important for multiple objects]
Change the filters parameter in the convolutional layer just before the yolo layer according to the formula
filters=( classes + 5 ) * 3
Since we are using classes = 1, thus, #filters in our case is 18. You should make this change if you are dealing with more classes.
k. Change number of classes parameter in yolo layer [Important for multiple objects]
Also should make this change if you are dealing with more classes.
l. Names file
We need to specify the names of the classes in the .names file. In our case, there is only 1 class and thus, only Ambulance is added to that file.